How to make a Minecraft resource pack
- with block variants and custom models Skip to mainThis guide is for total beginners, like I was! It may over explain things, like where certain files are located and how to find them. If you don't have any coding experience, thats okay, I will hold your hand!
If you're here, you may also find Minecraft Wiki's resource pack tutorial helpful too. They also have a page on how model files are formatted.
This guide assumes you are devloping your resource pack for Java first, there will be a section at the end for converting a Java pack to Bedrock. This is because it is much easier to test your pack in Java than in Bedrock, as you can toggle resource packs in game without exiting your world.
Created: July 5, 2026 - Last Updated: July 31, 2026
Where to put resource packs
First you will want to figure out where to put your texture pack in order to test it as you work on it.
You can launch Minecraft itself and click Options > Resource Packs > Open resource pack folder, and it will open the actual folder that the resource packs will go in. You can see what folder that is in and so forth in the file path bar. This is the easiest option, especially if you are using a different Minecraft launcher than the default Microsoft one (resource packs may not show up with the next method when opening Minecraft from a third party launcher, though you may be able to open the .minecraft folder from the launcher without actually launching Minecraft).
If you don't want to launch Minecraft, you can go to the .minecraft folder directly! For Windows you can search %appdata% in the start menu search bar. In Linux you can go to your home folder, in the tool bar up top select View > Show Hidden Files, and .minecraft will be right there along with the downloads, documents, music, etc folders. I'm not familiar with Mac, but it looks like it will be in Library > Application Support > minecraft. Note that if you are opening Minecraft from a third party launcher, resource packs put here may not show up, try the previous method instead.
Right inside the .minecraft folder will be the resourcepacks folder, where you can copy paste your texture pack folder/zip file (either one will work, though you may want to extract the zip into a folder so it is easy to edit). If you don't have one yet, you can make a new folder here and name it something (it doesn't even have to be your pack's final name, you can rename it), that way you can easily edit and test your files without moving things.
- (other folders)
- resourcepacks
- your texture pack
Where to find vanilla Minecraft textures
You will want a reference of Minecraft's default texture and model files so that you can see what folders they are located in and what exactly their file names are (in order to override them). Accessing these files is slightly more tricky. For this, go to the main .minecraft folder through the last method, or from the default launcher (you can't access these from a third party launcher).
Go to .minecraft > versions. There will be folders for each instance of Minecraft you have made, usually one for each update or modded version of Minecraft you have played. (If you haven't launched Minecraft from the built in launcher, do so with your desired update so that it can make a version folder for it). Open the version of Minecraft you want to test your texture pack in. Inside will be a .json file and a .jar file with the version name. Here I am going to use version 26.2, but you can do which ever version you like.
- (other folders)
- versions
- (other version folders)
- 26.2
- 26.2.jar
- 26.2.json
Right click the .jar file and select Extract Here. This will make a folder you can explore. You may want to move this folder to an easier to access spot, like your desktop or documents.
Inside of that folder you just extracted, go into the assets folder and then the minecraft folder. This is it! Here you will find the textures and models folders! Your own texture pack will mimic this pattern of folder nesting and naming. Like the version folder, your pack will have a minecraft folder in an assets folder. And in your minecraft folder, you will have at least a textures folder, where block textures will go in the block subfolder, and item textures will go in the item subfolder. There is also a painting subfolder in the texture folder, and a lot of other folders for things you might want to retexture, but blocks and items will likely be the main categories.
- assets
- minecraft
- blockstates
- models
- textures
- block
- entity
- item
- painting
- (more folders)
- (more folders)
- minecraft
If you can't find the texture for a block in the vanilla minecraft block folder, it may be in one of those other folders. Try the entity folder next. While in a folder like the block folder, you can search words to narrow down the files, by holding the Ctrl and F keys at the same time. This will bring up a little search bar that you can type a word into, like "planks" or "sign". Finding where a file is actually located is important so that you can put it in the same series of folders in your pack. Your chest textures won't override vanilla Minecraft chest textures if you put them in your pack's block folder (put them in a chest folder and put that in an entity folder in your pack).
If you want to test your texture pack for an older version of Minecraft, first make a new instance with that specific update (via the default Minecraft launcher). Make a new world and you can enable your texturepack in the menu. If certain textures you made are missing or have errors (and they were fine in the version you made it for), you will want to copy Minecraft's vanilla resources again, but for this version (.minecraft > versions > [version you want to test] > extract .jar file > open extracted folder). This is because sometimes file names have changed, or what folder some textures go in have changed. "iron_chain.png" used to be just "chain.png". Sign textures used to have a sign folder in the entity folder, but now they are in the block folder without a subfolder.
For your pack to be compatible when you find differences between the current update and an older one, you may need redundant files. In the block textures folder I have both "iron_chain.png" and "chain.png", which are the exact same texture. This is so players can see my retextured iron chain in versions before and after copper chains were added.
Resource pack file structure
Now that you can access the vanilla Minecraft assets folder, your texture pack will need to be organized the same way. Now if you don't have anything in a given folder you don't need to include it. You may not change anything in the font folder. Minecraft will use its vanilla files where there are none in the resource pack. Since you don't need to copy everything in the vanilla Minecraft assets folder, its best you don't in order to keep your pack efficient and lightweight. Only copy what you plan to change. Delete it if you aren't going to edit it.
Your pack will also include a few files along side the assets folder. Below you can explore the resource pack folder structure by opening "folders" and descriptions for other files. If this part is confusing, thats okay! I will explain more after it, and in the order of what is easiest to do first.
Texture Pack Name
assets
minecraft will be the only folder here unless you are also retexturing blocks/items for mods. Each mod will have its own folder. Note that the "minecraft" folder is not capitalized!
minecraft
These are the main folders you will be in, you are unlikely to need to add any others found in vanilla Minecraft's corresponding folder.
For each block there is a .json file, which links the model file(s) to said block (most blocks only have one model file, but a few have more). The .json files go directly in here, no sub folders. You will likely only need put files here if you want to assign variants to a block. Most of your models will be here if you chose to remodel anything. The 3D model for each block goes here. Make a .json file with the same name as the original in order for your remodel to apply. Each model has its corresponding texture(s) linked to it in this file. If you make variants, each variant will need its own model file. Some blocks are already made up of multiple 3D parts, like fences and bars (their posts and connected sides are different files). Since these also have wood and metal versions, these parts have templates. A spruce fence post .json model file will link to the fence post template as its parent, and then just define its texture as spruce wood planks. That way the same shaped model does not need copy pasted for every fence color. You may not need this folder, unless your changed models messed with the corresponding item model (rails and ladder in my case). This is the classic texture pack part of resource packs! Here live the png files! Easy to edit in your favorite pixel art drawing program. Use the same file name as the vanilla texture to override it. They will have to be in the following folders though. Most of your pngs will be in here. Some blocks may not support transparency if their orginal textures are solid. Keep in mind that some blocks have different top/bottom and side textures, like logs. Texture files for mobs, minecarts, chests, boats, banners and other weird blocks. If you can't find it in the block folder it might be here. Moon pngs for each moon phase go here, keep their filenames the same. The sun png goes directly in the celestial folder. The rain texture goes directly in the environment folder. The snow texture also goes here. Graphical User Interface, aka the menus. I have not edited the GUI, so I won't go futher into this folder. Item pngs go directly in here! No subfolders. Campfire smoke, rain splashes, bubbles, explosions, falling leaves/petals, etc go here. Most of your textures will be in block and item. There are more folders I did not include since I haven't gotten into them myself (colormap, effect, map, misc, mob_effect, painting, and trims). Note that most of these folders are singular, not plural! Your textures won't override vanilla Minecraft if they are in a folder named "blocks" or "items".blockstates
models
block
item
textures
block
entity
environment
celestial
moon
sun.png
rain.png
snow.png
gui
item
particle
credits.txt
Just a plain text file where you can credit your inspirations, sources for images, sources for code, etc. Not necessary for texture pack function, but nice to do. Edit this in a plain text editor like notepad. You can also make another text file called README.txt or info.txt for any information you'd like users to know, such as versions your pack works for, links to your modrinth/cursforge/planet minecraft accounts, permissions for other people, etc.
pack.mcmeta
This text file is actually necessary and has to be formatted a specific way. You'll edit it the same way as a regular text file. Must be named pack.mcmeta.
{
 "pack": {
  "description": "Adds a little ~spice~ to enhance vanilla Minecraft",
  "pack_format": 15,
  "supported_formats": {"min_inclusive": 15, "max_inclusive": 100 },
  "min_format": 15,
  "max_format": 100
 }
}
The brackets, quotes, colons, and commas are all very important. Like the json files, this will not work if even one is missing. The description is what shows up when a player is selecting which resource packs to use in game.
pack_format is which version your resource pack is for. Minecraft Wiki has a table showing the pack formats for minecraft versions. This value is required, and only one can be chosen, even if your pack works for a range of updates.
supported_formats allows you to define a range of values, though you can't go any lower than 15. You can however, go above the most recent update. You can choose to do this if you believe your pack will still work for future updates.
min_format and max_format do the same thing ^^
Note how the last item in a {} bracket set does not have a comma after it, this is how this file and all .json files must be formatted.
pack.png
This is just a 128px by 128px png used as your packs icon in the player's resource pack selection screen. It is shown with your pack's description. Make it whatever you want ^^
Heres an overall visualization:
- pack.mcmeta
- pack.png
- assets
- minecraft
- blockstates
- .json files
- models
- block
- .json files
- item
- .json files
- block
- textures
- block
- image files
- item
- image files
- (more texture folders)
- block
- blockstates
- minecraft
Starting your resource pack
Okay, now you know where your pack goes, and have vanilla Minecraft assets on hand to reference file names and locations. Now to actually work on it!
First in your texture pack folder you will want:
- a folder called assets, leave this empty for now
- an image named pack.png, this is the icon for your pack, ideally a 128px wide/tall square, can be a placeholder or missing for now (Minecraft will give your pack a cobblestone icon)
- a text file called pack.mcmeta, right click inside your pack folder, select Create Document > Empty File, we will edit this next
Your pack folder should look like this:
- assets
- pack.mcmeta
- pack.png
Setting up pack.mcmeta
Now right click pack.mcmeta > Open With and select your favorite text editor. Something basic like Notepad will be fine.
{
 "pack": {
  "description": "Adds a little ~spice~ to enhance vanilla Minecraft",
  "pack_format": 15,
  "supported_formats": {"min_inclusive": 15, "max_inclusive": 100 },
  "min_format": 15,
  "max_format": 100
 }
}description- text next to your pack's icon in the player's resource pack selection menu, brief descriptionpack_format- which version your resource pack is for, required value, only one can be chosen (even if your pack works for a range of updates), Minecraft Wiki has a table showing the pack formats for minecraft versionssupported_formats- allows you to define a range of values, but you can't go any lower than 15, however, you can go above the most recent update (if you believe your pack will still work for future updates)min_formatandmax_formatdo the same thing
The brackets, commas, colons, and quotes are all very important, your pack may give an error if just one of these is missing. Note how every item in a {} bracket set has a comma at the end, except the last item in the set; this is how this file and all .json files must be formatted.
If this is giving you trouble, you can ditch everything except the description and min/max formats, and just go with the current version's format number.
{
 "pack": {
  "description": "My cool Texturepack",
  "min_format": 88,
  "max_format": 88
 }
}
Note that this will not work for versions 1.21.8 and earlier, "pack_format": 64 is required (number is just an example).
Fret not if you can't seem to find the right numbers, even if the format number you chose is for a version of Minecraft that is older or newer than the player's version, they can still apply it. Minecraft will give a warning that the pack is outdated or for a future version, but the player can use it anyways. This is usually also true even if the warning says the pack is incompatible (this means that pack.mcmeta was likely formatted wrong or with invalid values).
The next few folders
Now that you have you can see your pack in the resource pack select menu, we want to go into the assets folder. Add a new folder called minecraft inside this. If you are retexturing blocks/items/mobs from a mod, then the mod folder will go here too, next to the minecraft folder. We are just going to focus on Minecraft, however. Inside the minecraft folder, add three new folders and name them blockstates, models, and textures. Your assets folder should look like this:
- minecraft
- blockstates
- models
- textures
If you don't plan on editing 3D models, or making variants for blocks, you can get rid of the models and blockstates folders (blockstates are what we use to add variants).
Textures
Basic textures
You will want to start with an easy block that has the same texture on all sides, like cobblestone.png or dirt.png. This will go in the block folder which is inside the textures folder. Be sure that it is named "block" not "blocks". You can either make a new file from scratch or copy Minecraft's file over to your block folder and edit it in your art program (a basic program like ms paint is honestly enough). If you do start from scratch just make sure to name the file exactly the same as Minecraft's. Also be sure that the file is in the corresponding location.
- block
- cobblestone.png
- dirt.png
Load your texture pack and see how your work looks in Minecraft!
Tip for seamless textures
 in a temporary file about 200px wide, make a draft of your texture and copy it
 paste your texture four times next to each other so it forms a 2x2 square of the block, you'll see some weird areas where they meet
 edit the seams out to make a smooth transition between the blocks
 select the middle 16 by 16 pixels and copy it
 paste this four times to make another 2x2 square
 edit any remaining seams
 select and copy the middle 16 by 16 pixels again, this may be your final texture!
 make sure it looks alright when you put it next to itself by making another 2x2 square, if it doesn't, repeat the above steps
Some blocks have a side texture and a top/bottom texture, like "oak_log_top.png" and "oak_log.png" (the sides), try editting those! Doors have a top and bottom texture, named like "oak_door_top.png" and "oak_door_bottom.png".
Your block texture folder will be filling up now!
- block
- cobblestone.png
- dirt.png
- oak_door_bottom.png
- oak_door_top.png
- oak_log.png
- oak_log_top.png
Blocks like flowers, mushrooms, and short grass are positioned in a cross of the 2D file, but the file still has to be a 16px square. Just be sure to position it at the bottom in the center so it isn't floating and so that its centered over the middle of the cross.
Spritesheet textures
Some blocks, instead of using multiple different files for different sides, use a sprite sheet with all the sides laid out in the same png file (like a skin texture). This is true for mobs, chests, boats, signs, shelves, and animated textures.
It can be difficult to tell which part of the png file is a certain face of the block, so you may try drawing over it and seeing where it shows up on the block when you reload your pack.


Above is an example of a sign, where red is the top, dark blue the bottom, yellow the right side, and purple the left side.
Animated textures
Some of these textures include water, lava, lanterns, campfires, prismarine, etc. There will be a long strip of 16px squares, each a frame of the animation. You can edit this, but just be sure to copy over the blocks corresponding .mcmeta file into your pack. For example, "copper_lantern.png" will be accompanied by a text file called "copper_lantern.png.mcmeta" (the .png before .mcmeta is not a typo). No need to edit this file, just copy it.
- block
- copper_lantern.png
- copper_lantern.png.mcmeta
How to make variants for Minecraft blocks
You can go ahead and draw some alternate textures now, just give them unique names that don't already correspond to an existing block. For my bookshelf variants, I creatively named them "bookshelf2.png", "bookshelf3.png", "bookshelf4.png", etc. These will go in the texture folder along with the textures that override vanilla ones.
- block
- bookshelf.png
- bookshelf2.png
- bookshelf3.png
- bookshelf4.png
- cobblestone.png
- dirt.png
- etc
I only included "bookshelf.png" here because I changed it, you don't need to include it if you're not editing it.
In order to have Minecraft use these textures as variants, we will need a blockstate .json file for the block, and a model for each variant. So if you haven't already, make a blockstates folder and a model folder inside of your minecraft folder like so:
- pack.mcmeta
- pack.png
- assets
- minecraft
- blockstates
- models
- textures
- minecraft
Lets take a look at what the blockstate file looks like for the bookshelf in vanilla Minecraft. Here is where it will be located in that vanilla minecraft reference folder you extracted from .minecraft/versions/26.2/26.2.jar (or whichever version you are using):
- assets
- minecraft
- blockstates
- bookshelf.json
- blockstates
- minecraft
{
 "variants": {
  "": {
   "model": "minecraft:block/bookshelf"
  }
 }
}
Its just telling Minecraft which model to use for the bookshelf block (a model convieniently named "bookshelf"). Note that it is referencing a model file, not a simple texture file. This complicates things in that we have to make a model file for each one of our textures, but it will be easy, and this allows us to make different shaped block variants if we want. So before we edit this file, we have to make new models for each new texture. We won't have to do anything 3D for this, we will just be changing a file name.
In order to make models for our alt textures, lets look at vanilla Minecraft's bookshelf model, which is in the block folder of the model folder:
- assets
- minecraft
- models
- block
- bookshelf.json
- block
- models
- minecraft
Note that this is also called "bookshelf.json", but it's not the same file as the blockstates file. It can have the same exact name because it is in a different folder. Anyways, it looks like this:
{
 "parent": "minecraft:block/cube_column",
 "textures": {
  "end": "minecraft:block/oak_planks",
  "side": "minecraft:block/bookshelf"
 }
}
"parent": "minecraft:block/cube_column"tells Minecraft what template to use for the textures,cube_columnis the template used for blocks like logs, that have a texture for the top and bottom, and a different texture for the four sides"textures": {}this is where the texture variables for the model will be defined, "cube_column" uses two variables, "end" for the top and bottom faces, and "side" for the side faces"end": "minecraft:block/oak_planks"defines the "end" variable as the oak plank texture file (bookshelves do have the oak plank texture as their top and bottom)minecraft:tells Minecraft that we are in the "minecraft" folder (not a folder for a mod)block/further specifies that we are in the block folder not the item folder, (implied to be the block folder within the texture folder since it is in"textures": {})- note how it is just "oak_planks" not "oak_planks.png", every texture file will be a .png, so the file extention is not needed here
"side": "minecraft:block/bookshelf"defines the sides as the bookshelf.png file (found in minecraft/textures/block), this is what we will be changing for our variants
In our pack's model folder, we are going to make a new folder called block, and in there we are going to put new files for each alt texture: "bookshelf2.json", "bookshelf3.json", and "bookshelf4.json" like so:
- block
- bookshelf2.json
- bookshelf3.json
- bookshelf4.json
We don't need "bookshelf.json" since that is already part of vanilla Minecraft and we are not changing it.
{
 "parent": "minecraft:block/cube_column",
 "textures": {
  "end": "minecraft:block/oak_planks",
  "side": "minecraft:block/bookshelf"
 }
}
For our bookshelf2.json model file, we want it to use the bookshelf2.png image as its "side" texture, so we will edit "side" texture in the above file.
{
 "parent": "minecraft:block/cube_column",
 "textures": {
  "end": "minecraft:block/oak_planks",
  "side": "minecraft:block/bookshelf2"
 }
}
Literally all that was changed was the file name listed as the "side" texture, I replaced "bookshelf" with "bookshelf2". Our alt bookshelf textures are in the same folder structure that the vanilla bookshelf texture is in (mincraft/textures/block), so nothing other than the file name itself needed changing. Also remember that the texture file names do not need the .png ending here.
Similarly, the bookshelf3.json model file will have "side": "minecraft:block/bookshelf3" as its last line, and so on.
Something interesting to note, is that we dont need minecraft: in these files for them to still work:
{
 "parent": "block/cube_column",
 "textures": {
  "end": "block/oak_planks",
  "side": "block/bookshelf4"
 }
}
This will still work. I suspect if you are using a template or texture from a mod, you would need "mod_name:" in place of "minecraft:", but I have not tested this.
Now that we have model files for each texture that link to their respective textures, we need to edit our blockstate file for bookshelves. Lets make a new file called "bookshelf.json" in our blockstates folder (this is the same name vanilla Minecraft uses, which is important for us to be able to override it).
- bookshelf.json
{
 "variants": {
  "": {
   "model": "minecraft:block/bookshelf"
  }
 }
}
Now lets add our variant models!
{
 "variants": {
  "": [
   { "model": "block/bookshelf" },
   { "model": "block/bookshelf2" },
   { "model": "block/bookshelf3" },
   { "model": "block/bookshelf4" }
  ]
 }
}
Notice how inside of "variants": {}, we have "": [] instead of "": {}; the square brackets indicate that there is a series of items rather than just one. The items themselves are in a set of curly {} brackets each. Said items are separated by a comma after their ending } bracket, except for the last item.
We also do need to include "bookshelf" here, even if you haven't changed the texture/model, in order for Minecraft to use it as a variant.
Our pack files should look like this now:
- pack.mcmeta
- pack.png
- assets
- minecraft
- blockstates
- bookshelf.json
- models
- bookshelf2.json
- bookshelf3.json
- bookshelf4.json
- textures
- bookshelf.png
- bookshelf2.png
- bookshelf3.png
- bookshelf4.png
- (other textures)
- blockstates
- minecraft
Be sure to test it out! If it doesn't work, check for typos and missing/extra commas or brackets. You may also try to narrow down possiblities for errors and try just two variants in the blockstate file (just remember to delete the comma after the last variant).
How to make block variants more common than others
Now you may be wondering if you can make some variants more common or rare than others, and you can! To each model in the blockstate file, we can add a weight.
{
 "variants": {
  "": [
   { "model": "block/bookshelf", "weight": 8 },
   { "model": "block/bookshelf2", "weight": 6 },
   { "model": "block/bookshelf3", "weight": 4 },
   { "model": "block/bookshelf4", "weight": 1 }
  ]
 }
}
The higher the number, the more common it is. Here, "bookshelf4" is the least common variant, for every single "bookshelf4" texture there is, there will be eight "bookshelf"s, six "bookshelf2"s, and four "bookshelf3"s. If you wanted to make one variant super rare, you can make the weights of the other variants a lot larger.
Note that we have a comma between the "weight" value and the "model" value for each variant. Also note how the numbers do not have quotes around them.
Editing 3D block models
This covers how to manually edit the .json model files. I do this because there is something wrong with me. You might want to use Blockbench instead.
Model overview with how to make a flat 2D model (simple example)
I wanted to make some clover variants for short grass, but short grass is normally in a cross like mushrooms and flowers, so I couldn't just make a new texture and change the file name in its model file (which is what we did with the bookshelf variants). Thus I had to edit the 3D model entirely. This will be flat on the ground like rails or leaf litter. This is just a single face of a 3D object so it will be easy.
We don't even need to look at vanilla Minecrafts short grass model file, since we will be pretty much starting from scratch.
{
 "ambientocclusion": false,
 "textures": {
   "particle": "block/clovers",
   "clover": "block/clovers"
 },
 "elements": [
  {
   "from": [0, 3, 0],
   "to": [16, 3, 16],
   "faces": {
    "up": { "texture": "#clover", "tintindex": 0 }
   }
  }
 ]
}
"ambientocclusion": false,this just means that this texture will not be affected by shading that occurs when a block is in a corner (normal light levels still apply), you can omit this or set it to true if you do want your model shaded by being in a corner. This is not usually needed"textures": {},variables for textures are defined here"particle": "block/clovers",particle is used frequently in these files, it tells Minecraft what texture file to use for the little bits when the block is broken. Something is actually wrong with my code here though, because it still uses the normal short grass texture as the broken particles"clover": "block/clovers"you can also make your own variable names and define what texture they are. I defined "clover" to be the clovers.png texture in the block folder of the texture folder. I use this variable later in this file
"elements": []this is where the 3D stuff happens! Each "element" is a rudimentiary part of a 3D model: a square, rectangle, cube or rectangular prism. We only have a flat square so we only need one element. Each element will be in a curly bracket {} set"from": [0, 3, 0],the starting coordinates of the element, since its 3D we have three coordinates [x, y, z], where the middle number is the height (Y), and the other two are the width (X) and depth (Z)"to": [16, 3, 16],the ending coordinates- X starts at 0 and ends at 16, making the shape 16px wide
- Z also starts at 0 and ends at 16, making the shape 16px deep, forming a square with X
- Y remains the same at 3, making it flat height wise, thus remaining a 2D square, which hovers 3px above the bottom of the block
- if Y started at 0 and ended at 1, this shape would be a 1px thick "square" like a carpet
- I made it hover 3px because the short grass model varies in placement, often being submerged a few pixels into the block below it. On rare occassion it is submerged beyond 3px, hiding my clover texture entirely
- I'm often not sure which direction X and Z affect, so I'll just guess each time, test it, and adjust if needed
"faces": {}defines what textures are used for each face of the 3D element! If you made a cube or even a carpet like shape, you could specify the texture for all six faces"up": { "texture": "#clover", "tintindex": 0 }"up" defines the texture for the top of the shape, "down" would be for the bottom, "north", "south", "west", and "east" are for the sides- we only need the "up" face since it is a 2D square being viewed from above, if used, the other faces would copy this format and be separated by comma
"texture": "#clover"this just says that the face's texture is the variable "#clover" that we defined as "block/clovers" earlier (meaning it will use the "clovers.png" file in the block folder of the textures folder)"tintindex": 0this makes our texture grass tinted, to get rid of a tint, use"tintindex": 1or omit the tint index entirely.
Model properties
Some useful odds and ends you might find around in vanilla files or other resource packs. At the moment this is just a closer look at two properties already touched upon by the previous example, and rotation of "elements".
How to remove or add ambient occlusion from a block
If you are getting weird dark shadows on any of your textures, it might be ambient occlusion.
Ambient occlusion is the shading on a block when it is in a corner, which is different from light level shading. This is what causes the dry grass paths to have dark edges where they meet normal grass (since it is slightly shorter than full blocks, thus "shaded" by the higher ones).
{
 "ambientocclusion": false,
 "textures": {},
 "elements": []
}{
"ambientocclusion": true,
"textures": {},
"elements": []
}This is not placed in the elements or texture sections, so I have hidden the inner details of those. Instead, ambient occlusion is outside of these, and followed by a comma since there are more things after it on the same level.
I set ambient occlusion to false on my angled 3D rails, since it was casting a very dark shadow on them.
How to remove or add grass tint to a texture
To add grass tint, we need to add "tintindex": 0 to every face of our model.
"elements": [
 {
  "from": [0, 3, 0],
  "to": [16, 3, 16],
  "faces": {
   "up": { "texture": "#clover", "tintindex": 0 },
   "down": { "texture": "#clover", "tintindex": 0 }
  }
 }
]
This is just an element of a model file, not the whole model file. Notice how the tint is added to each face. Also note that the tint is separated from the texture by a comma, and there are no quotes around the number.
This may only work for blocks that already support grass tinting, like short grass.
To remove grass tint, we need to either remove the tint property altogether, or change it to "tintindex": 1
"elements": [
 {
  "from": [0, 3, 0],
  "to": [16, 3, 16],
  "faces": {
   "up": { "texture": "#clover", "tintindex": 1 },
   "down": { "texture": "#clover", "tintindex": 1 }
  }
 }
]
Or
"elements": [
 {
  "from": [0, 3, 0],
  "to": [16, 3, 16],
  "faces": {
   "up": { "texture": "#clover" },
   "down": { "texture": "#clover" }
  }
 }
]
Don't forget to remove the comma after the texture when deleting the tint.
How to rotate a block model
This is really how to rotate an element in a block model, I ended up having to put this in every element to rotate the whole model.
"rotation": {
  "origin": [ 0, 2, 0 ],
  "axis": "x",
  "angle": -45,
  "rescale": true
}
This is an example of how just one element in my south/west raised minecart rail model is rotated. This is what allows it to be at a diagonal angle. Unfortunately I had to put this in every element for my model. Here is how it fits in with the rest :
"elements": [
 {
  "from": [2, 1, 0],
  "to": [4, 2, 16],
  "rotation": {
    "origin": [ 0, 2, 0 ],
    "axis": "x",
    "angle": -45,
    "rescale": true
  },
  "faces": {...}
 }
]
You can change the origin coordinates, axis, and angle, but you want to keep "rescale": true set.
How 3D coordinates in Minecraft models work
Each rudimentary shape in a 3D model is defined in "elements": [] like so:
"elements": [
 {
  "from": [4, 1, 4],
  "to": [12, 1, 12],
  "faces": {
   "up": { "texture": "#example" }
  }
 }
]
This is a flat square so I only specified the upper face of the shape. But how do we know its flat? Here we are going to look at "from": [4, 1, 4] and "to": [12, 1, 12] which specifies where the shape begins and ends in 3D space. The numbers are coordinates, one for each dimension: width (X), height (Y), and depth (Z), in that order. These dimensions are represented by X, Y, and Z, so [x, y ,z] would be a placeholder set of 3D coordinates.
In this example the height (Y) for both the start and end coordinates is 1, meaning it is flat. The width and depth go from 4 to 12, so it is 8 pixels wide and deep, making a square. Lets look at this square from above, disgregarding the height (Y):
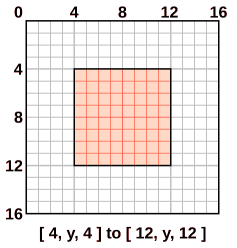
Important to note, is how the coordinates for X and Z start at the top left.
Now lets put it in 3D space showing height:
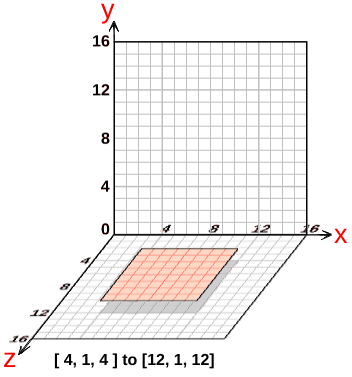
Interestingly, the height (Y) axis starts from the bottom, not the top, so when y=1 the face is one pixel above the bottom of the 16px cube. It should also be easier now to see why I call the Z axis "depth".
What if we made this a 3D shape, maybe just one pixel high like carpet?
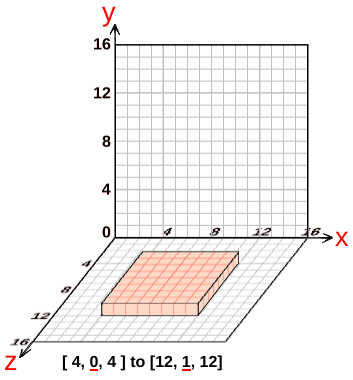
Our element in our model file would look like this:
"elements": [
 {
  "from": [4, 0, 4],
  "to": [12, 1, 12],
  "faces": {
   "up": { "texture": "#example" },
   "down": { "texture": "#example" },
   "north": { "texture": "#example" },
   "south": { "texture": "#example" },
   "east": { "texture": "#example" },
   "west": { "texture": "#example" }
  }
 }
]
Here the height (Y) has actually changed, and we added textures for each face now that it has six sides.
Let's take a closer look at this shape:
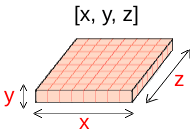
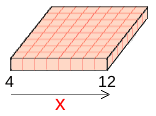
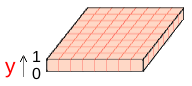
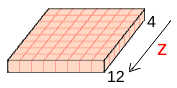
![diagram of the 1 pixel thick square, with all of its edges labeled and its coordinates given as [4,0,4] to [12,1,12].](3dcoordsxyz.png)
Thats how the coordinates for the 3D model work, but there are also coordinates for textures, to make things more confusing. Most of the time, we don't need to specify texture coordinates, but sometimes we do, if our texture is not centering on our model how we want.
Exceptions to the [x,y,z] model coordinate directions
Sigh. For some blocks you might find that things are rotated around, so that the X and Z coordinates do not go in the direction I said they did. Maybe this is why people use Blockbench.
Most normal blocks - that do not depend on the players direction as they place the block - will work the way described above. Wool, ores, clay, glowstone, etc. Though there are a few normal appearing blocks that do act weird. Dirt, sand, skulk, and netherack are rotated randomly, thus your model will face different directions. Bedrock does not rotate randomly, but it is rotated 180 degrees around the Y axis for every bedrock block.
Expect blocks that depend on the position you are as you place them (like stairs) to act weird, and not even consistent with each other. Shelves, and fence gates also appear to be rotated 180 deg around the Y axis, while stairs appear to be rotated 90deg. Fences themselves are even more odd due to how they connect.
I can't test and list every exception, but don't be suprised when you come across one. At least Y seems consistent in most cases for block models (except netherrack, which rotates any direction, not just around the Y axis). Trial and error is inevitable.
Changing the position of a texture on a model
(or what does "uv" do in Minecraft model files?)
You will want to be sure you understand how the 3D model coordinates work before reading this section.
Now lets go over default behavior of how textures are applied to a model. Suppose I have a flat 2D model again, and importantly, its not 16x16 pixels.
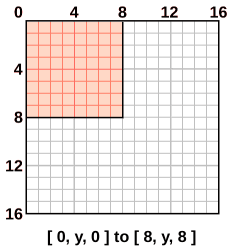
"elements": [
 {
  "from": [0, 1, 0],
  "to": [8, 1, 8],
  "faces": {
   "up": { "texture": "#example" }
  }
 }
]
If we apply a log texture to this ("textures": { "example": "block/oak_log_top"}), our texture will look like this:

Our model is an 8 by 8 pixel square in the top left of the 16 by 16 available space, and by default, all Minecraft textures will be centered over the 16 by 16 area, thus, if our model face is in the top left, it will take the top left of the texture.
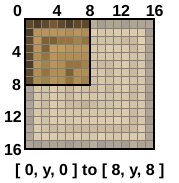
If our model is in the center, it will take the center of the texture, like so:
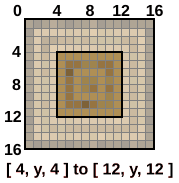
This model is an 8 by 8 pixel square in the center of its 16 by 16 available space, so it will take the center of the texture. It doesn't matter what Y is here, because the face we are applying the texture to spans the X and Z axes (this is true only for textures on the "up" and "down" faces, the other faces do use Y).
But what if we want the top corner of the texture, but we don't want this model face to be in the top left of the block? To do this, we will have to add "uv" to each face of the element in the model file, and specify the coordinates of the texture.
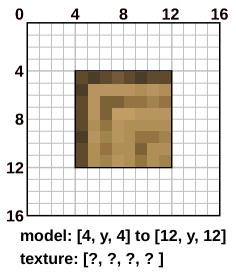
"uv" to our model face:"elements": [
{
"from": [4, 1, 4],
"to": [12, 1, 12],
"faces": {
"up": { "uv": [x1, y1, x2, y2], "texture": "#example" }
}
}
]This specifies where on the texture file we want to use. The first two numbers (x1 and y1) will be the starting coordinates on the texture (only two because its a 2D texture, not a 3D model), and the last two numbers (x2 and y2) will be the ending coordinates on the texture. The start and end texture coordinates are listed together in a square bracket set [] rather than seperately like the model coordinates, which can make them confusing to write.
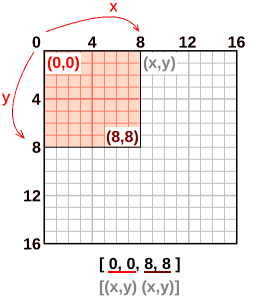
This is of the texture not the model, so the up and down axis here is the Y axis, as all 2D coordinates are (x,y), not (x,z). One thing already sucks about this. You may remember that on models the Y axis starts at 0 from the bottom, but here it starts at the top. Yeah. This will make you lose your mind while trying to match your texture up to your model.
"elements": [
 {
  "from": [4, 1, 4],
  "to": [12, 1, 12],
  "faces": {
   "up": { "uv": [0, 0, 8, 8], "texture": "#example" }
  }
 }
]
Here our model coordinates are in the center, and the texture coordinates are in the top left corner. Note how "uv" is put in the brackets for each face, and separated from "texture" by a comma. The coordinates are not in quotes, but "uv" is, and "uv" has a colon after it.
We have acheived what we wanted, but lets look at a few more positions for the texture coordinates.
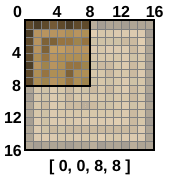
[8, 8, 16, 16]: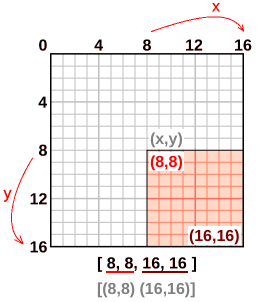
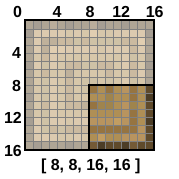
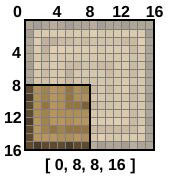
[0, 8, 8, 16]: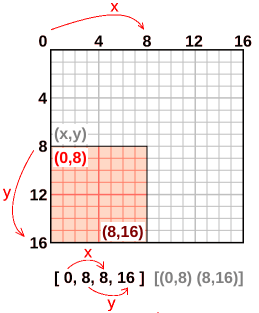
[8, 0, 16, 8]: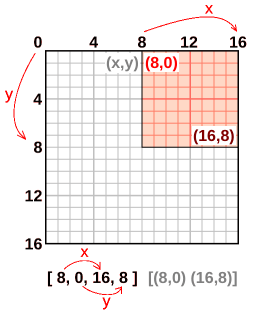
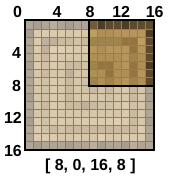
Of course, these four corners are not the only possiblities, you could put your square or rectangle anywhere! You'll just want to be sure that it matches the dimensions of your model face, otheriwse your texture will get squished or stretched.
The coordinates for texture placement is not very intuative, but hopefully this can give you some place to start, though you will probably still have to do some trial and error.
Making a more complex 3D model (fence gate)
Lets actually make a 3D model, not just a flat face! This section will cover remodeling an exisiting Minecraft block with a few different basic shapes (elements), how template model files are used, modeling past the standard 16 pixel cube boundaries, and a practical application of using "uv" to reposition a texture.
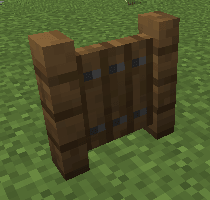
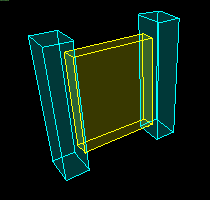
It features three basic shapes: A post on the left, a post on the right, and the center door. These each will have an element in the model file.
Lets look at the posts first.
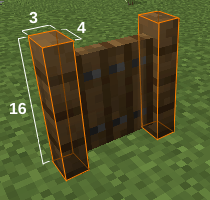
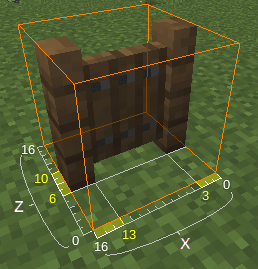
The posts are 16 pixels tall (Y), 3 pixels wide (X), and 4 pixels deep (Z) each. But we can't use these as coordinates yet, we have to figure out where each shape is in relation to the 16 by 16 by 16 cube it is in.
Remember that fence gates are one of the blocks that do not follow the standard model coordinate directions. X starts from the right rather than the left, and Z starts from the front rather than the back. Y thankfully remains starting from the bottom.
- Y: easy since it is the full block height from 0 to 16
- Z: fences and gates are centered in the middle of the block (unlike doors), so our four pixel deep posts are the four pixels in the middle of the Z axis, meaning it is from 6 to 10
- X (right): the right post starts at 0 and is 3 pixels wide so it ends at 3 (X: 0-3)
- X (left): the left post ends at 16 so it must start at 13 for it to be 3 pixels wide (x: 13-16)
Lets put these coordinates in order. The right post starts at x=0, y=0, z=6 and ends at x=3, y=16, z=10. The left post starts at x=13, y=0, z=6 and ends at x=16, y=16, z=10.
{
 "parent": "block/block",
 "textures": {
  "particle": "#texture"
 },
 "elements": [
  { "__comment": "post right",
   "from": [ 0, 0, 6 ],
   "to": [ 3, 16, 10 ],
   "faces": {
    "down":  { "texture": "#post" },
    "up":    { "texture": "#post" },
    "north": { "texture": "#post" },
    "south": { "texture": "#post" },
    "west":  { "texture": "#post" },
    "east":  { "texture": "#post" }
   }
  },
  { "__comment": "post left",
   "from": [ 13, 0, 6 ],
   "to": [ 16, 16, 10 ],
   "faces": {
    "down":  { "texture": "#post" },
    "up":    { "texture": "#post" },
    "north": { "texture": "#post" },
    "south": { "texture": "#post" },
    "west":  { "texture": "#post" },
    "east":  { "texture": "#post" }
   }
  }
 ]
}
"parent": "block/block"this is a template in vanilla Minecraft that defines some things like how the model looks in the player's hand and in menus, the block itself would look the same without this"textures": { "particle": "#texture" }this defines the broken particles as the #texture variable, which is defined in a later file"__comment": "post right"we can label our elements with a comment, that way we can easily find each basic shape in a model if we need to edit it later- Note that the smaller coordinate positions go in the first
"from"coordinates, and the larger coordinate positions go in the"to"coordinates"from": [ 16, 0, 6 ], "to": [ 13, 16, 10 ]would be incorrect!
"texture": "#post"#post is a variable I made since I will be using a different texture for the posts and gate door. I have #post defined in a different file
Whats this talk about a different file? My gate model here is a template so that it can be used for all gate wood colors, without having to copy paste the code into every gate file. Each gate will have its own .json file in the model folder, and it will reference the gate template like so:
{
 "parent": "minecraft:block/template_fence_gate",
 "textures": {
  "texture": "minecraft:block/spruce_gate",
  "post": "minecraft:block/spruce_planks"
 }
}
Each wood gate file will reference the template through "parent" and define the texture variables. We already used the "texture" and "post" variables in our template, but here is where they are defined, since each wood fence will use different textures. I defined "post" as the fences respective plank texture, and "texture" as my custom made texture for each gate. I used "texture" in the template for the particles, but I will also use it for my next element in the model file, the actual door (right now the model is just the gate posts).
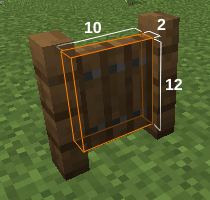
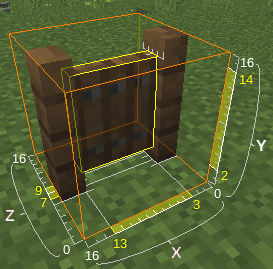
The gate door is 12 pixels tall (Y), 10 pixels wide (X), and 2 pixels deep (Z).
Okay, theres a lot going on in the second picture, sorry. This element is floating, not touching any of the faces of the full block, so it is easiest to reference it to the posts.
- width (X): it spans fully betwen the posts, so its width is from 3 to 13
- depth (Z): the door is inset a pixel from the front and back of the posts, which span from 6 to 10, meaning the gate spans from 7 to 9
- height (Y): the door is two pixels shorter than the top and bottom of the posts, thus it spans from 2 to 14
So we start at x=3, y=2, and z=7, and we end at x=13, y=14, and z=9, making our coordinates start from [3,2,7] to [13,14,9].
{
 "parent": "block/block",
 "textures": {
  "particle": "#texture"
 },
 "elements": [
  { "__comment": "middle",
   "from": [ 3, 2, 7 ],
   "to": [ 13, 14, 9 ],
   "faces": {
    "down":  { "texture": "#texture" },
    "up":    { "texture": "#texture" },
    "north": { "texture": "#texture" },
    "south": { "texture": "#texture" },
    "west":  { "texture": "#texture" },
    "east":  { "texture": "#texture" }
   }
  },
  { "__comment": "post right",
   "from": [ 0, 0, 6 ],
   "to": [ 3, 16, 10 ],
   "faces": {
    "down":  { "texture": "#post" },
    "up":    { "texture": "#post" },
    "north": { "texture": "#post" },
    "south": { "texture": "#post" },
    "west":  { "texture": "#post" },
    "east":  { "texture": "#post" }
   }
  },
  { "__comment": "post left",
   "from": [ 13, 0, 6 ],
   "to": [ 16, 16, 10 ],
   "faces": {
    "down":  { "texture": "#post" },
    "up":    { "texture": "#post" },
    "north": { "texture": "#post" },
    "south": { "texture": "#post" },
    "west":  { "texture": "#post" },
    "east":  { "texture": "#post" }
   }
  }
 ]
}
We now have used the #texture variable in the model too! Remember how that was defined in the model file for each fence gate as the custom gate texture I made for each fence. If you just want to use the plank texture for whole thing, you wouldn't even have to redo the individual model files for each gate type, you could just use "#texture" as your face textures in the template file (#texture is defined in the vanilla Minecraft fence model files as the fence type's respective planks).
To be clear, with my custom gate textures, I will have these files:
- models
- template_fence_gate.json
- acacia_fence_gate.json
- bamboo_fence_gate.json
- birch_fence_gate.json
- cherry_fence_gate.json
- etc...
- textures
- acacia_gate.png
- bamboo_gate.png
- birch_gate.png
- cherry_gate.png
- etc...
Using just the planks texture, we would only need the template file!
- models
- template_fence_gate.json
- (unrelated models)
Again, just make sure every face has "texture": "#texture", not any other texture variable.
We're not done by the way. If we right click our fence gate to open it, it appears to do nothing, although we can walk through it.
Open fence gate model
We now need to model this open gate, which is done in template_fence_gate_open.json.
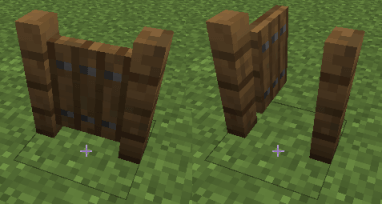
But since gates are in the middle of the block, and I am not splitting the door into two, my element for the door will go past the 16 by 16 by 16 cube boundaries of a normal block. This is actually possible to model, our ending depth (Z) coordinate will just have to be larger than 16. Lets see how much past the 16 pixel bounary this door will go.
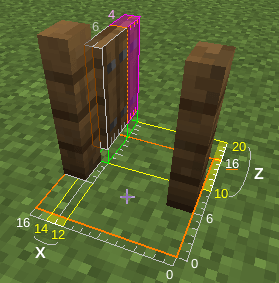
Y: stays the same, yay (2 to 14)!
X: the thickness of our door is two pixels, this used to be along the Z axis as depth, but our door is rotated so that its thickness is along the X axis with the width of the posts. Here I want it behind the left post, but sticking out a little bit, one pixel as shown here. We know the posts are 3 pixels wide, and that the left post goes from 13 to 16. Since our door goes a little further intowards the center, it starts at 12, and since it is two pixels thick, it ends at 14 (12 to 14).
Z: the width of our door is ten pixels, which used to be along the X axis, with the width of the posts, but it has been rotated so now it lies along the Z axis with the depth of the posts. I want it exactly behind the left post, which ends at 10. Since our door is 10 wide, it will need to end at 20 (10 to 20). This is clearly beyond our 16 pixel block limit, but lets try it!
{
 "textures": {
  "particle": "#texture"
 },
 "elements": [
  { "__comment": "middle",
   "from": [ 12, 2, 10 ],
   "to": [ 14, 14, 20 ],
   "faces": {
    "down":  { "texture": "#texture" },
    "up":    { "texture": "#texture" },
    "north": { "texture": "#texture" },
    "south": { "texture": "#texture" },
    "west":  { "texture": "#texture" },
    "east":  { "texture": "#texture" }
   }
  },
  { "__comment": "post left",
   "from": [ 13, 0, 6 ],
   "to": [ 16, 16, 10 ],
   "faces": {
    "down":  { "texture": "#post" },
    "up":    { "texture": "#post" },
    "north": { "texture": "#post" },
    "south": { "texture": "#post" },
    "west":  { "texture": "#post" },
    "east":  { "texture": "#post" }
   }
  },
  { "__comment": "post right",
   "from": [ 0, 0, 6 ],
   "to": [ 3, 16, 10 ],
   "faces": {
    "down":  { "texture": "#post" },
    "up":    { "texture": "#post" },
    "north": { "texture": "#post" },
    "south": { "texture": "#post" },
    "west":  { "texture": "#post" },
    "east":  { "texture": "#post" }
   }
  }
 ]
}
Again, I used my custom texture for the gate door ("texture": "#texture"), which looks like this:

I have one for each wood type, and they all have the outer pixels a solid color because they arent being used (as my gate door is only 12 pixels tall and 10 pixels wide, the same dimensions that are detailed in this texture).
This texture centers like expected on the closed gates, but does not on the open gate:
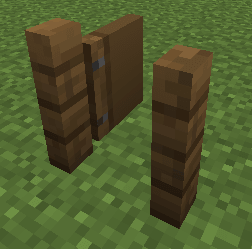
This is because our door shape is not centered in the 16 pixel cube like it was in the closed model. Compare:
All dimensions in the closed gate were centered, but only the height is for the open gate.
As explained in the section on changing how a texture is positioned on a model, by default textures will center over the 16 by 16 bounds of the cube.
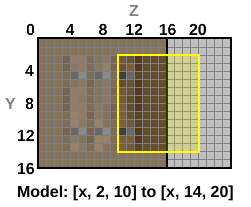
It doesn't matter what X is here (remember X for the open gate is the 2px thickness) since this face of the model is on the YZ plane. The blank spaces appear to be filled in with the last column of pixels on the texture.
So lets look at what we need our "uv" coordinates to be for it to center our texture.
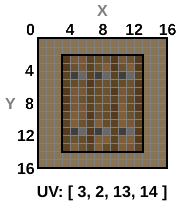
We have X here instead of Z like the model uses, but thats okay because textures are 2D and always use (x,y). Lets just confirm our dimensions, our gate door is 10 pixels wide and 12 pixels tall, which is the same here for the "uv" coordinates.
Okay so now we need to put the "uv" coordinates on the faces, but we can't put them on all the faces! The top and bottom faces ("up" and "down") are 2 pixels wide and 10 pixels long, 10 by 12 won't fit on there, instead it will squish onto that face. The real problem now is figuring out if our two faces are "north" and "south" or "east" and "west". One set is our 10 by 12 face, and the other set is the thickness side of the doors which are 2 by 12.
It honestly pretty easy just to trial and error it to find out that we are going to use these "uv" coordinates on the east and west faces.
{ "__comment": "middle",
 "from": [ 12, 2, 10 ],
 "to": [ 14, 14, 20 ],
 "faces": {
  "down":  { "texture": "#texture" },
  "up":    { "texture": "#texture" },
  "north": { "texture": "#texture" },
  "south": { "texture": "#texture" },
  "west":  { "uv": [ 3, 2, 13, 14 ], "texture": "#texture" },
  "east":  { "uv": [ 3, 2, 13, 14 ], "texture": "#texture" }
 }
}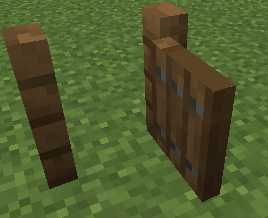
We are almost there. The front and back of the door are fixed! It just appears that the top, bottom, and sides are still wonky.
I was sucessfull in fixing the top, but then I placed another fence gate down, facing perpendular to this one. The texture didn't lay the same way. So I gave up and changed my "up", "down", "north", and "south" face textures to the post texture, which I had defined as the respective wood plank for each gate.
{ "__comment": "middle",
 "from": [ 12, 2, 10 ],
 "to": [ 14, 14, 20 ],
 "faces": {
  "down":  { "uv": [ 12, 3, 14, 13 ], "texture": "#post" },
  "up":    { "uv": [ 12, 3, 14, 13 ], "texture": "#post" },
  "north": { "texture": "#post" },
  "south": { "texture": "#post" },
  "west":  { "uv": [ 3, 2, 13, 14 ], "texture": "#texture" },
  "east":  { "uv": [ 3, 2, 13, 14 ], "texture": "#texture" }
 }
}
I did still have to experiment with the "up" and "down" "uv"s to fix them, nothing systematic though, really just trial and error.
How to make a solid Minecraft block transparent (WIP)
Note that some blocks do not support transparency. Blocks that have transparent portions in vanilla do, like doors, leaves, and glass, but ones that have solid textures likely will not. Any transparent pixels will be filled in with black. There is a quick fix for this however! Ewan Howell made a resource pack called solid block tranpsarency support, which you you can add to your pack, solving this problem. The pack is really just a .fsh file in the shaders > core folder. Leave your files with transparent sections as they are, and it should work.
Your pack will now have a "shaders" folder inside the minecraft folder:
- textures
- shaders
- core
- terrain.fsh
- core
The main problem with this method is that it does not work for versions earlier than roughly 1.20. To support older verions of minecraft you will have to fake transparency by altering the block model. This is unfortunately a pain in the ass, and more annoying the more complex shapes your transparent pixels form.
You will basically have to split your texture up into rectangles around the transparent parts and make an element in the model file for each rectangle.
I wanted my oak gate door to have transparent sections like the oak door and trap door, so I made this texture:
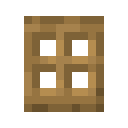
But the transparent parts filled in with black, since this block does not support transparency, and while the method above worked perfectly, it didn't for the older versions of Minecraft that I wanted to support.
I orginally had one element in the model file for the gate door (and one for each post flanking the door), a 10 by 12 by 2 rectangular prism, but had to split it up into six like so:
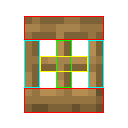
Here I have a top, bottom, left side, right side, verticle slat, and a horizontal slat (which overlap each other). We have to avoid the transparent areas in order for them to be transparent, and an element can only be in a rectangle/square or cube/rectangular prism, so we have to make sections around the transparent areas.
In my code, these sections are technically 3D, with a 2 pixel width like the orginal door, so I set the "north" and "south" faces as my gate texture so it would show on both sides without making twice as many elements. I left the other faces out, so that it wouldn't look fully 3D, but more like how vanilla doors and trapdoors look. The exception being the outer shapes, such as the top bar of the door having an "up" face, and the bottom bar having a "down" face, both of which I defined as the planks texture rather than my gate texture, since the transparent spots in my own texture were not playing nice with the sides.
Work in Progress (WIP)
The following is very much in progress, and possibly inaccurate as I test things! At the moment this is serving as notes for myself.
Work in Progress (WIP)
The following is very much in progress, and possibly inaccurate as I test things! At the moment this is serving as notes for myself.
How to convert your pack to Bedrock (WIP)
This sucks.
Where to put a resource pack in Bedrock
First you want to know where to put your pack in order to test it. Type %appdata% into the Windows start search bar, it will pull open the roaming file for Minecraft. Open Minecraft Bedrock > Users > Shared > games > com.mojang > resource_packs and make a new folder in here, name it what you want for your pack. When you download someone else's pack it automatically removes spaces and cuts the name off to ten characters, so keep that in mind if you are having problems.
How to load a resource pack in Bedrock
You may want to download someone elses texture pack as a reference, making sure you are able to load theirs, before testing your own. If you download their file, it will either be a .zip file or a .mcpack file. If it is a .zip file, extract it, and move the folder into the resource_packs folder we just navigated to as described above. If it is a .mcpack file, just double click it where ever you downloaded it (doesn't need to be moved), and it will even launch Minecraft for you with the pack loaded!. This guide will eventually show you how to do that for your own pack, but we have to get it structured right first.
First files for a Bedrock resource pack
Already the base file organization is different. Even "pack.png" becomes "pack_icon.png", but this is the easiest change (just rename the file). We will no longer have an "assets" folder with a "minecraft" folder. Instead we will just have a "textures" folder right there. Next up is our meta data, we had "pack.mcmeta" in java, but this will become "manifest.json". It will also be formatted entirely differently too (boooo).
Your pack folder should look like this:
- textures
- manifest.json
- pack_icon.png
Formatting manifest.json for a Bedrock resource pack
put some stuff here
Bedrock textures
One of the biggest frustrations in converting a pack, is that many of the block file names are different and you have to rename your files in order for them to work. "red_mushroom" becomes "mushroom_red", "light_gray_wool" becomes "wool_colored_silver", etc. The folders can be similarly different. In order to see how Vanilla Bedrock organizes and names its files (so we can override them), we will have to download them. This is somehow more complicated than accessing them in Java. I'm going to save both you and me the trouble of searching online for them, and directly link to where you can download your desired version: Bedrock releases on github. On the sidebar will be a release list where you can select the version you want, most likely the most recent full release (not a preview). Select one and open the assets drop down if its not already open, and click the file ending in -full.zip to download it (may take a second because it is large). Now you can extract the folder and explore its files.
You will want to go into the resource_pack folder. From there, the "textures" folder will have the familiar "blocks" and "items" folders, just note that these folder names are plural, unlike their Java equivalents (tiny, easy to overlook differences like this can drive you nuts when troubleshooting).
You can go ahead and copy your java block files into the "blocks" folder. Some file names will be the same, like "glowstone", but others will be different. The easiest way to find out which are the same and different, is to load your pack and see which blocks still have vanilla textures instead of your own. Locate this block in the vanilla bedrock folder (ctrl + F) and copy its name. Right click your file in your pack folder select Rename and paste the name you copied (just be sure you don't delete .png or add an extra .png). Load your pack again to see if it worked!
How to change the model of a vanilla block in Bedrock
Sorry this heading is almost clickbait, you can't edit block models in Bedrock :(. You can change which model template a block uses, but you cannot make your own custom models for a vanilla block, nor can you use different models for variations of the same block (like how I use different models for my short grass variations). Sadly, this means that I could not include my 3D ladders, 3D rails, remodeled fences, nor my shelf mushrooms. I ended up splitting my short grass variants into the normal short grass variants, and making the flat ones into grass top texture variants (I copied the grass texture and pasted the clovers on top).
changing the model template example
How to give blocks variants in Bedrock
You can actually do this, but its a bit different than Java. Instead of .json files for every block in a blockstates folder, you will have one terrain_texture.json file in the textures folder, that you put all block variants into.
- blocks
- items
- terrain_texture.json
How to add Vibrant Visuals support to your Bedrock pack
By default your resource pack will disable Vibrant Visuals, but it is really easy to make your pack load on Vibrant Visuals, you will just have to add the following to your manifest.json file:
"capabilities" : [
  "pbr"
]
Yay, now you can test your pack! Now your block textures will not have the default materials settings applied to your blocks, you will have to make these. For example, if you retextured the gold block, it will not be metaillic and shiney like it is in vanilla. Likewise your glowstone will not appear to glow as much. These properties are defined in a separate MERS .tga file for each texture.
What is a MERS .tga file in Bedrock and how do you edit it?
Vibrant Visuals Resource Packs - Overview of Physically Based Rendering - Texture Set JSON and Introduction to Texture Sets - MERS Texture Lab
What does that mean? Each vanilla block has a corresponding image file ending in _mers.tga This file specifies a few properties your block has, such as how metallic it is (M), how much it glows (E - emissive), how rough or smooth it is (R), and how much sub-surface scattering it has (S). Each of these properties is defined by the image's color channel (tga is just an image file like png). You can make a block have a uniform emissivity (glow) for example, but you can also define the glow for each pixel, corresponding to your texture. You would likely want the blue dots on sculk to glow, but not the black parts. Lets look at each property individually.
| Property | Channel | Description |
|---|---|---|
| Metallic (M) | Red | Saturated red for higly metallic, black for non metallic blocks like wood. |
| Emissive (E) | Green | Saturated green for high glow (light source blocks) low saturation for low glow (redstone ore), and black for no glow (most blocks). |
| Roughness (R) | Blue | Similar to metallic in that they are both shiny. Use black for blocks like glass and diamond, that are very reflective, but not metallic. You can also have metallic blocks that are not shiny, like copper in various oxidation states. Use saturated blue for non reflective blocks like logs. |
| Subsurface Scattering (S) | Aplha (opacity) | This is what simulates the bright green glow of sunlight shining through tree leaves for the leaf block. This is likely only applicable for translucent or thin blocks that you would expect sunlight to shine through, like slime, honey, resin, stained glass, leaves, vines, and banners. This is defined by how opaque a pixel is, full solid opacity is max subsurface scattering, and clear transparent is no subsurface scattering. |
All four of the channels can be combined into one image. If you want a section on your texture to be both reflective and emissive, it would combine both saturated blue and green, making cyan/teal! If you want a section to be just reflective, it would be blue. If you want a section to be both metallic and reflective (like the gold block), it would combine both red and blue, making magenta/purple. If you wanted your texture to be both metallic and emissive (maybe for the redstone block), the MERS texture would be yellow (red + green for light). Now it might be a dirty dark yellow, since you probably don't want it to be super metallic or glowy. It might even be closer to orange or brown, if you want it to be more metallic than it is emissive.
It is easiest to make these layers individually, maybe by editing your original texture, and then combining them in a program that supports layers, like Gimp. With Gimp we can set each layer as "addition" which makes them act like different colors of light laying ontop of one another (leave the bottom layer as normal). We can then export this as a png if we did not define the subsurface scattering alpha (opacity channel). We would end the file name like iron_block_MER.png, since we did not define S, we can name the file with just "MER" and make it a simple .png.
For block textures with subsurface scattering, first combine your color channels, and then adjust the opacity. You can do this for the whole texture or each individual pixel. Full opacity for high scattering, extremely low opacity for normal solid sections. Export as a .tga file, naming it like resin_block_MERS.tga. According to Texture Set JSON and Introduction to Texture Sets, Minecraft will choose the higher value if both Metallic and Scattering are set, meaning a block can have either metallicness or scattering, but not both.
Help! Why are my textures so dark in Vibrant Visuals?!
You made a MER/S texture for your metal texture and got the metallicness and roughness right so that it looks great in sunlight. But then it turns pitch dark at night and indoors, looking awful compared to vanilla blocks and even blocks without a MER/S file. This was the case for my iron block. The solution was to halve the red saturation. I had it full max red because I read a guide that said that your material is either metallic or its not, and that while you can use intermediary steps of red for "interesting effects", its not realistic. Not true at all!!!!!!!!!!! Don't make your material 100% metallic! I agonized over this, trying to figure out what was wrong, doing a whole bunch of trouble shooting and about to give up because I coun't fix it, turns out I just had to reduce the red in my MER file.