CSS Tidbits!
Little CSS bits that I didn't learn from W3schools. More to be added!
The following demos assume you know some basic CSS, like making class attributes. If you're not quite there yet, I highly recommend W3schools!
Previous Sibling Selector
img + p is a next sibling selector example that selects a paragraph that occurs right after an image (only if they are in the same parent element), but what about a previous sibling selector? There isn't a dedicated symbol for it, but there is a work around:
p:has(+ img)This will select the paragraph before an image.
Set Extra Space Above a Linked to Page Section
Suppose you have a page with multiple sections and you have a table of contents linking to those sections. When you click one of those links, your view is cut at just barely the top of the section, potentially leaving no room between the top of the viewers screen and the heading. Heres a little tidbit for adding some extra space between the top of the screen and the linked to section:
:target {
  scroll-margin: 20px;}
:target identifies the section that the user is taken to when they click a link. scroll-margin sets the top of the screen however many units above the actual section (without adding extra space in the actual document). Scroll-padding works similarly.
Align Inline Elements to the Top
By default inline elements of different heights will sit along a bottom edge like so:
heres some example text thats longer than the others
shortest text
medium length text
But I often want them to sit along the top edge, which is easy to do with a single line!
vertical-align: top;heres some example text thats longer than the others
shortest text
medium length text
You put this code in the same class or element that display: inline-block; is in.
Fit Content Width
How to make a block element the width of its content without making it an inline block element, helpful if they are narrow and you don't want them to sit next to each other.
width: fit-content;Thats it!
Custom List Bullets
You can change the symbol used for bulleted lists using the ::marker psuedo element.
li::marker {
  content: '☛ ';
  color: black;
  font-size: 1.2em;}
The content property is what changes the symbol, you can copy paste a symbol into the quotation marks, or you can even use letters! You can change a few things like color and font properties, but not much else.
Using :target to Create Pages
I learned this from John Doe!
You can use JavaScript to make fake pages within one HTML document, but you can also use CSS! Both the JS and CSS methods work by hiding sections by default, and then showing them when a button or link is activated. The CSS method makes use of the :target psuedo-class.
Pretend this is a page with some navigation links.
Heres the first page content.
Heres the second page content.
Heres the third page content.
The CSS is really simple! Just make a class for your pages and style them to be hidden, then add :target to the page class (like you would add :hover to link or button elements), and make it display as a block.
.page {
  display: none;}

.page:target {
  display: block;}
In the HTML you will have to put the "pages" in a section, article, or div element (depending on what is most accurate), and give them your page class. They should also each have a unique ID (for the links to work.)
<div class="page" id="pg1">
  Heres the first page content.
</div>

<div class="page" id="pg2">
  Heres the second page content.
</div>

<div class="page" id="pg3">
  Heres the third page content.
</div>
Your navigation links should have the ID of its corresponding page in its src attribute (like you normally would for creating a table of contents in a page.)
<ul>
  <li><a href="#pg1">page 1</a></li>
  <li><a href="#pg2">page 2</a></li>
  <li><a href="#pg3">page 3</a></li>
</ul>
Note that your homepage will not disappear if you don't give it your page class (instead it will show along with whatever other page the vistor clicked on), but if you do give it the page class, your homepage will not automatically show up when someone visits your site (instead they just get what ever is outside of the page containers). If you want a home "page" to display when the user comes to your main page, but disapear when they select another "page", you could include its anchor in the link you provide.
a href="https://name.site.org/#home"However, if you want your home "page" to be shown by default with just "a href="https://name.site.org", I cobbled something together.
.page:target ~ #home {
        display: none;}
This selector specifies the element identified with #home in the HTML after a "page". Because of the :target, #home is only hidden when a .page is clicked on, thus if no page is clicked on, #home will remain visible.
Note: #home must be after all the .pages in the HTML for this to work!
Scaling up Pixel Art

I want to double the size this bunny pixel art so the pixels are more visable, but simply doubling the width results in a blurry image. Luckily only one additional css property is needed: image-rendering: pixelated.
.example {
  width: 64px;
  image-rendering: pixelated;}
I would hesitate to use this on unscaled pixel art however, as the pixels distort on some screens.
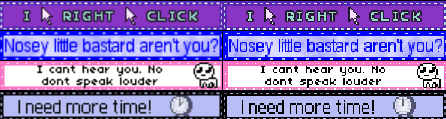
On the left are pixels without pixelated rendering, on the right the pixels have pixelated rendering. Pixelated rendering for unscaled images looks fine on some screens, but on others it produces irregular pixels, particularly noticable in lettering and line art. Thus pixelated rendering is mostly useful for pixel art that has been resized 2X 3X 4X etc.
Text on Background Lines
How to make text fall on lines of a background image (ex. notebook paper). This takes a little trouble shooting with dimensions, but revolves around one key property: line-height.
.example {
  background-image: url(https://solaria.neocities.org/recipes/linetile.png);
  background-size: 20px;
  line-height: 18.5px;}
I tried making lines under each line of text using bottom-border and text-decoration: underline but was unsucessful. Luckily a small background image file works just fine.

Since the dimensions are small, this file naturally tiles to make evenly spaced lines. Now it makes wider spaces than I wanted, so I resized it to 20px, but you could also crop some of the blank space out of the file to make the tile shorter.
I base line-height off of the height of the background image (before it is tiled). I then adjust it by trial and error, making it shorter if the text starts to run below the line, or making it longer if the text starts floating higher above the line.
Note that font-size does not matter, as long as it is not bigger than the line-height.
sometimes making the line-height and vertical paragraph margin the same height as the untiled background works, but not always.
How to give text a gradient
Without manually making each letter a different color.
If you're like me you've wanted to make text with a rainbow gradient, but the only way you knew how, was to put each letter in a span element and style each letter with a different color. This is extremely messy and inconvienent, especially if you want to change the text but keep the gradient. Thankfully the solution is not complex at all. You just need to style one element with three different properties (and if you make a class you can make any element have the same text gradient by giving it that class).
.rainbowtext {
  background-image: linear-gradient(to right, #e91e63, #ffc107, #009688, #673ab7, #e91e63);
  background-clip: text;
  -webkit-background-clip: text;
  color: transparent;}
There are three key components to how this class is styled:
- a
background-imageis defined (you can use a picture instead of a gradient if you wish) background-clip: text- this makes it so that the background only shows in the shape of the text-webkit-background-clip- used for browsers that do not support this property (such as google chrome)color: transparent- if the text is not transparent, its color will hide the background
Blocks vs Inline
Here's a gradient I use on my homepage! The gradient will span the entire length of the element. As such, block elements like paragraphs and divs will have the gradient span the whole line, regardless of the amount of text.
Inline elements on the otherhand, will display the whole gradient according to the length of the text.
Note that a short amount of text in a block element will not show the whole gradient if the text ends before the line. If you want a block element to display the gradient all throughout the text, rather than extending the whole line, style the element with display: inline-block;
Default block paragraph.
Paragraph displayed as an inline-block.
Looping animated background
I figured this one out through trial and error working on the background for this page! If your background image tiles seamlessly, this should work well.
An animation is defined with two frames. The word "background" after @keyframes is what I named the animation; you can name the animation anything.
@keyframes background {
    0% {
      background-position: 0px 0px;}
    100% {
      background-position: 307px 133px;}}
background-position is the only property that is animated.
It's important to use pixel units, otherwise the animation will not be smooth. The position pixels should equal the pixel dimensions of the image.
body {
      background: url(example.png);
      animation: background 12s infinite linear;}
The animation property is added to the desired element (the body in my case). You of course will also need to have the background image for this element.
- background is what I named the animation above
- feel free to play around with the duration of one animation
- infinite makes the animation loop
- linear is important to make the animation a smooth constant speed, otherwise it would be jerky
The direction of the animation depends on which corners are chosen as the start and end frames.
| Upper left: 0px 0px |
Upper right: Xpx 0px |
| Lower left: 0px Ypx |
Lower left: Xpx Ypx |
| down ⇓ | 0px 0px → 0px 133px |
|---|---|
| up ⇑ | 0px 133px → 0px 0px |
| right ⇒ | 0px 0px → 307px 0px |
| left ⇐ | 307px 0px → 0px 0px |
| diagonal to lower right ⇘ | 0px 0px → 307px 133px |
| diagonal to upper left ⇖ | 307px 133px → 0px 0px |
| diagonal to upper right ⇗ | 0px 133px → 307px 0px |
| diagonal to lower left ⇙ | 307px 0px → 0px 133px |